it solutions for special requirements

Kategorie: Entwicklung Seite 1 von 2

Developement, Php,

Git Cheat: remove BIG files

If you commit very big files and want to remove them from the git repo then use this usefull snippet:

git filter-branch --force --index-filter \
'git rm --cached --ignore-unmatch system/backup_V1.sql' \
--prune-empty --tag-name-filter cat -- --all

After removing the file you have to overwrite the remote repo.

You can use this snippet to remove unwanted files from git including all commits! This might be usefull to clean a repo from allready ignored files.

Typo3 Fluid

Das Typo3 CMS verwendet Fluid als Template Engine. Diese Engine kann einfach auch in anderen PHP standalone Projekten verwendet werden. Warum sollte man das machen?

  • Ermöglicht einen Migrationspfad zum Typo3 CMS
  • Es ermöglicht das wiederverwenden von Fluid Templates in eigenen Projekten.
  • Es ermöglicht eine sukzesive Einarbeitung in die Typo3 Entwicklung, da andere Komponenten wie Extbase ausgelassen werden.

Wie integriert man Typo3/Fluid in ein standalone Projekt ohne dem Typo3 CMS? Wiefolgt:

composer require typo3fluid/fluid
composer install

Nach dem einfügen des Autoloaders wird dem standalone Projekt nur noch das TempalateView Objekt hinzugefügt:

use TYPO3Fluid\Fluid\View\TemplateView;

view = new TemplateView;

Es müssen noch verschiedene Pfade gesetzt werden. Außerdem sind bestimmte Directories notwenig:

site_package
└── Resources
    ├── Private
    │   ├── Language
    │   ├── Layouts
    │   │   └── Page
    │   ├── Partials
    │   │   └── Page
    │   └── Templates
    │       └── Page
    └── Public
        ├── Css
        ├── Images
        └── JavaScript

Eine Php Beispiel-Klasse in dem Typo3/Fluid in einer standalone Umgebung integriert wird, ist der https://github.com/q-u-o-s-a/fallout-grabber/blob/master/AbstractController.php des Fallout-Grabbers.

Weitere Informationen findet man unter: Typo3 Docs: FluidTemplates

Fast docker with Nginx, MariaDB and Php, Part IV

Nach dem erstellen der :

  • DB Container auf Basis von mariadb:10.1.48
  • PHP Container auf Basis von php:7.4-fpm
  • SCP Container auf Basis von atmoz/sftp

benötigen wir noch einen Nginx Container der zum Host Port 80 freigibt.

Die Konfiguration für den Nginx Container inkl. der Anhängigkeiten zu den Containern aus Part I-III sieht wiefolgt aus:

version: '3'
services:
  web:
    image: nginx:latest
    depends_on: 
      - sftp
      - php
      - db
    ports:
      - '80:80'
    volumes:
      - template-html:/var/www/html    
      - ./container/web/nginx.conf:/etc/nginx/conf.d/default.conf    

Ebenso wie der Php Container und der Sftp Container mountet der Nginx Container das template-html Volume.

Das Config-File ./container/web/nginx.conf wird in das Host-Dateisystem gemounet um einfach editiert zu werden.

Das gesamte Projekt befindet hier auf https://github.com/getit-berlin/fast-docker-php-template

Fast docker with Nginx, MariaDB and Php, Part III

Die Anwendungsdaten unter /var/www/html werden nicht in das Hostsystem gemountet. Das wurde im Fast Docker Part II beschrieben. Das Directory /var/www/html wird in das volume gemountet:

    volumes:
      - template-html:/var/www/html

Um in dem Volume zu schreiben benötigen wir einen weiteren container. Dieses Verfahren beschleunigt radikal die Funktionsweise der Container. Daten werden nicht in das Hostsystem gemountet sondern bleiben im Container und im Besten Fall sogar im Cache und Arbeitsspeicher.

Die Konfiguration des sftp / scp Dienstes sieht wiefolgt aus:

  sftp:
    image: atmoz/sftp
    volumes:
      - template-html:/home/${SFTP_USER}/upload
    ports:
        - "${SFTP_PORT}:22"
    command: ${SFTP_USER}:${SFTP_PASS}:33

Als Basis für den Container wird atmoz/sftp verwendet.

Die entsprechenden Parameter werden über die .env Datei festgelegt.

SFTP_HOST=127.0.0.1
SFTP_PORT=2222
SFTP_USER=runner
SFTP_PASS=pass

Die Zeile:

command: ${SFTP_USER}:${SFTP_PASS}:33

legt fest welcher Systemuser den angemeldeten SCP /SFTP User representiert.

Das entsprechende Github Projekt kann man unter https://github.com/atmoz/sftp finden.

Das gesamte Projekt befindet hier auf https://github.com/getit-berlin/fast-docker-php-template

Fast docker with Nginx, MariaDB and Php, Part II

Im letzen Beitrag zum Thema fast docker Part I habe ich einen einfachen DB Container erstellt. Hier folgt jetzt der dazugehörige Php Container:

  php:
    ports:
      - '22:22'  
    build: ./container/php/.
    volumes:
      - template-html:/var/www/html
      - ./container/php/php.ini:/usr/local/etc/php/php.ini
      - ./container/php/log.conf:/usr/local/etc/php-fpm.d/zz-log.conf      
    environment:
      PHP_OPCACHE_VALIDATE_TIMESTAMPS: 1  

volumes:
  template-html:

Die Datei php.ini wurde nach „außen“ in den Ordner container/php/ gelegt. Damit ist sie im auch nach dem Build und Deploy leicht veränderbar.

Das Volume template-html wird alle Anwendungsdaten beinhalten. Es entspricht dem /var/www/html directory.

Das Volume wird nicht nach außen gemountet.

Das Docker Container File Dockerfile beinhaltet weitere Pakete für den php container, wie z.B. zip, mysql, opcache, gd, composer, git, wget, apcu, imagemagick und basiert auf PHP 7.4-fpm:

FROM php:7.4-fpm
USER root
RUN apt-get update --fix-missing

RUN apt-get install --yes libicu-dev
RUN apt-get install --yes libjpeg62-turbo-dev
RUN apt-get install --yes libfreetype6-dev
RUN apt-get install --yes libpng-dev
	
RUN docker-php-ext-install -j$(nproc) mysqli pdo_mysql opcache
RUN docker-php-ext-configure gd --with-freetype --with-jpeg 
RUN docker-php-ext-install -j$(nproc) gd
RUN docker-php-ext-configure intl && \
    docker-php-ext-install -j$(nproc) intl
	
ENV PHP_OPCACHE_VALIDATE_TIMESTAMPS="0"
ADD opcache.ini "$PHP_INI_DIR/conf.d/opcache.ini"	

RUN cd /usr/src && \
    curl -sS http://getcomposer.org/installer | php -- --install-dir=/usr/bin --filename=composer
	
RUN apt-get install --yes sudo
	
RUN apt-get install --yes unzip
RUN apt-get install --yes zip

RUN apt-get install --yes git
RUN apt-get install --yes bzip2	
RUN apt-get install --yes libbz2-dev	
RUN docker-php-ext-install bz2	

RUN apt-get install --yes wget

RUN apt-get install -y default-mysql-client

RUN apt-get install -y \
        libzip-dev \
        zip \
  && docker-php-ext-install zip

# APCU
RUN pecl channel-update pecl.php.net 
RUN pecl install apcu igbinary 
RUN docker-php-ext-enable apcu igbinary 

# IMAGICK
RUN apt-get update && apt-get install -y libmagickwand-dev --no-install-recommends && rm -rf /var/lib/apt/lists/*
RUN printf "\n" | pecl install imagick
RUN docker-php-ext-enable imagick
RUN apt-get update && apt-get install -y imagemagick

RUN docker-php-source delete

#USER www-data
USER root

Die Datei opcache.ini wird für den opcache gebraucht.

Das gesamte Projekt befindet hier auf https://github.com/getit-berlin/fast-docker-php-template

Fast docker with Nginx, MariaDB and Php, Part I

Nach vielen Versuchen und Messungen der Perfomance unter Last habe ich folgendes docker-compose.yaml erstellt.

Hier ist erstmal die Definition des DB Containers:

  db:
    image: mariadb:10.1.48
    container_name: ${DB_HOST}
    restart: always
    ports:
      - '3306:3306'
    volumes:
        - template-db:/var/lib/mysql
    command: ['mysqld', '--character-set-server=${DB_CHARSET}', '--collation-server=${DB_COLLATION}']
    environment:
      MYSQL_USER: ${DB_USER}
      MYSQL_PASSWORD: ${DB_PASS}
      MYSQL_DATABASE: ${DB_NAME}
      MYSQL_ROOT_PASSWORD: ${DB_ROOT_PASS}
      
volumes:
  template-db:

Die verschiedenen Variablen werden via .env File festgelegt.

DB_HOST=deployment-db-2
DB_USER=run
DB_PASS=ldisfk24esf
DB_ROOT_PASS=ldiamQa943
DB_NAME=my_db
DB_CHARSET=utf8mb4
DB_COLLATION=utf8mb4_unicode_ci

Die Datenbank ist vom Host unter dem dem Port: 3306 und dem localhost erreichbar. Innerhalb der Docker-Container ist die Datenbank unter dem Host deployment-db-2 erreichbar.

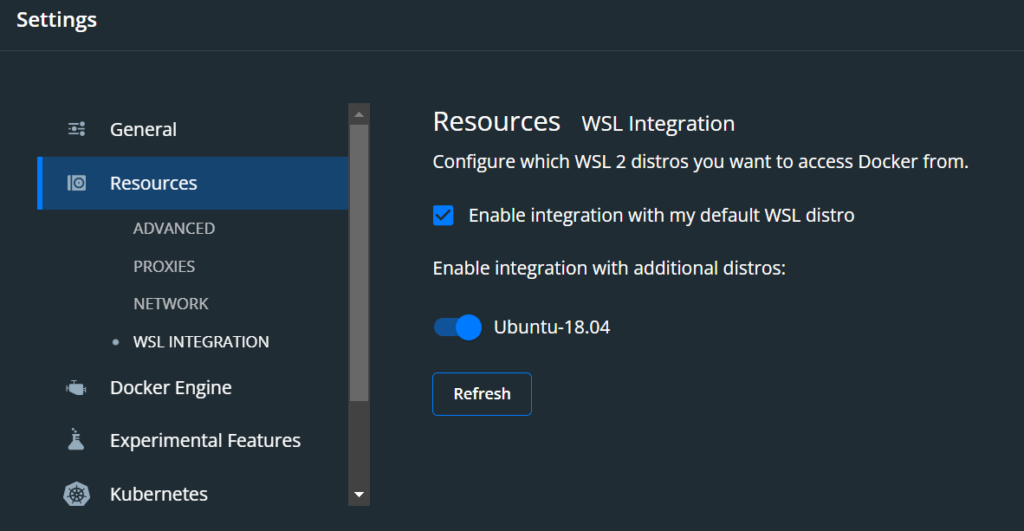
Docker Desktop und WSL2

Um WSL 2 in einer Docker Desktop Umgebung unter Windows zu nutzen bedarf es ein wenig Konfiguration.

wsl.exe -l -v

wsl.exe --set-default-version 2

In den Eigenschaften des Docker Desktops kann man die Distribution unter Settings -> Resources -> WSL Integration einstellen.

Ich empfehle Ubuntu 🥳

Change permissions, files and directories

How to change all permissions on files and directories? That’s easy, but how to include all directories and files in underlying directories?

It can be done like this:

find . -type d -exec chmod 0755 {} \;
find . -type f -exec chmod 0644 {} \;

Code smell … smells like … (Methoden)

Was stinkt und versteckt sich im Code? Hässliche Methoden im Code!

Das was ich am meisten hasse, sind hässliche Methoden

Albert einSTein

Nun, was sind hässliche Methoden und wie sollte man sie vermeiden? Wenn man sich einfach an PSR hält ist man schon auf der richtige Seite.

Hier noch zwei kleine Tips:

  • Max 3 Parameter pro Methode
  • 30 Linien pro Methode

Back in buisness …

Ok, enough is enough! Enough cake, enough Binge Watching, enough boardgames and old shool gaming (have you seen remastered versions of our childhood games? 😮🤩) …

More templates: We updated JoomLavel/documentation and we are proud to announce that more templates for JoomLavel/connect will be published on github.com/JoomLavel/templates soon. Templates enhance JoomLavel/connect functionality and are nearly finished.

Laravel Joomla DB Integration: Finally we are about to publish JoomLavel/JoomaDbLink. This component of the JoomLavel platform allows to integrate Joomla Database with Lumen or Laravel in an easy intuitiv way (eloquent).

So stay tuned 🥳

Seite 1 von 2

Präsentiert von WordPress & Theme erstellt von Anders Norén